


Hello there, We learned about Pytorch, tensors, autograd, etc. in the previous article. Let's look at how to create a neural network in PyTorch and train a simple classification model in this tutorial.
This is an extension of my previous tutorial blog - Getting started on DeepLearning with "PyTorch" - PART 1.
Now Let's look at building our own neural network in PyTorch.
NEURAL NETWORKS
Neural networks can be constructed using the torch.nn package.

nn depends on autograd to define models and differentiate them. An nn.Module contains layers and a method forward that returns the output.
Procedure for building a Neural network:
Define the neural network using a few parameters that can be learned (or weights).
Repeatedly go through a set of inputs.
processing user input over a network.
Determine the loss (how far the output is from being correct).
Reproduce gradients into the network's settings.
Adapt the network's weights.
DEFINING THE NETWORK
import torch
import torch.nn as nn
import torch.nn.functional as F
class Net(nn.Module):
def __init__(self):
super(Net, self).__init__()
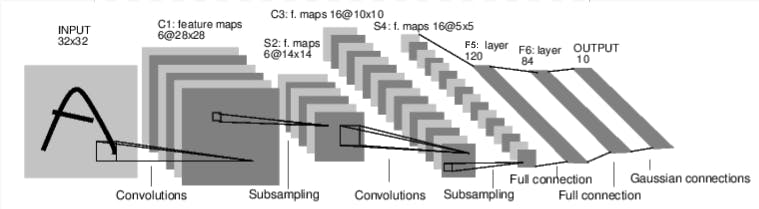
self.conv1 = nn.Conv2d(1, 6, 5)
self.conv2 = nn.Conv2d(6, 16, 5)
# an affine operation: y = Wx + b
self.fc1 = nn.Linear(16 * 5 * 5, 120) # 5*5 from image dimension
self.fc2 = nn.Linear(120, 84)
self.fc3 = nn.Linear(84, 10)
def forward(self, x):
//MAX POOLING OVER 2X2 WINDOW
x = F.max_pool2d(F.relu(self.conv1(x)), (2, 2))
# If the size is a square, you can specify with a single number
x = F.max_pool2d(F.relu(self.conv2(x)), 2)
x = torch.flatten(x, 1) # flatten all dimensions except the batch dimension
x = F.relu(self.fc1(x))
x = F.relu(self.fc2(x))
x = self.fc3(x)
return x
Only mini-batches are supported on torch.nn. One sample is not supported by the complete torch.nn package; only inputs that are a mini-batch of samples are.
For instance, a 4D Tensor of nSamples x nChannels x Height x Width will be accepted by nn.Conv2d. With random gradients, zero every parameter and backprop gradient buffers.
Let us see how we can compute the loss:
A loss function uses the inputs (output, target) to calculate an estimate of how far the output is from the target.
The nn package includes a number of distinct loss functions. nn.MSELoss, which calculates the mean-squared error between the output and the target, is an example of a simple loss.
output = net(input)
target = torch.randn(10) # a dummy target, for example
target = target.view(1, -1) # make it the same shape as output
criterion = nn.MSELoss()
loss = criterion(output, target)
print(loss)
To backpropagate the error all we have to do is to loss.backward(). You need to clear the existing gradients though, or else gradients will be accumulated to existing gradients.
Now we shall call loss.backward(), and have a look at conv1’s bias gradients before and after the backward.
net.zero_grad()   #zeroes the gradient buffers of all parameters

print('conv1.bias.grad before backward')
print(net.conv1.bias.grad)

loss.backward()

print('conv1.bias.grad after backward')
print(net.conv1.bias.grad)
That's It, In this article, we have discussed on:
Defining a neural network
Processing inputs and calling backward
Computing the loss
outro:
I hope this article is informative and useful for you. In this 2 series article, we saw what Pytorch, tensors, and autograd is and build our neural network, and processed it. If you find it very interesting like me, I encourage you to dig deeper and know the inner functionalities and complexities. Many tech giants like tesla use and recommends PyTorch over other frameworks for its robust features.
related sources:
Thank you for reading 😊
Happy Learning